Categories
Info and News Materials & Essays

How to Size a Hoop Studio

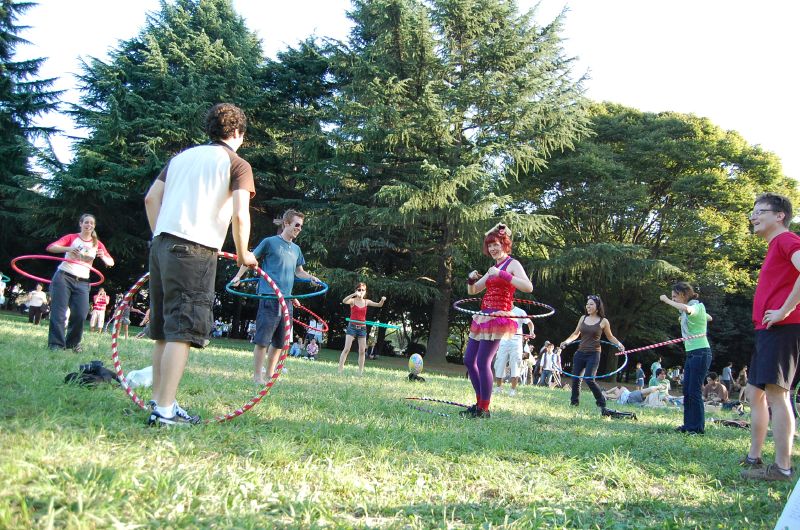
When we head indoors to hoop, we start to look for locations where we have enough space.

Some of us are lucky to find a gymnasium to use – enough space for everything you might want to do. The rest of us have to look into dance studios, community centers and other places that weren’t meant for large scale athletics.

When you are evaluating a room to hold classes and hoop jams, how can you tell how many hoopers will fit in it? This is an important question if you are sharing the rental price or trying to cover it with your class fees and still make a profit.

A hooper needs space on all sides for the hoop to spin, and different hooping styles need more or less space. For example, waist hooping needs less space than most off-body hooping. hooper-area
The same space will hold eight on-body hoopers, or 2-3 off-body hoopers. 

How Much Space is Enough?

You can figure the area needed per hooper based on armspan + the size of the hoops you use.  Let’s do the math for four different scenarios.

On-body hooping

On-body hooping is pretty compact. For each hooper, you’ll want armspan + a bit or twice the diameter of the hoop, whichever is bigger. This doesn’t allow for much moving around, dancing or flailing but it is enough to stand and hoop on waist, legs, and shoulders without hitting anyone.

Armspan is about the same as height, so if your hoopers average 5’7″/170 cm and your hoops are 40″/100 cm, you are looking for an 80″/200 cm circle. That’s about 44 square feet/4 sq m per person. 

Circles can pack into a space more tightly than squares, but a square gives you a little extra room for footwork and it is easier to figure out when you are looking at a floorplan that’s marked in square feet or square meters.
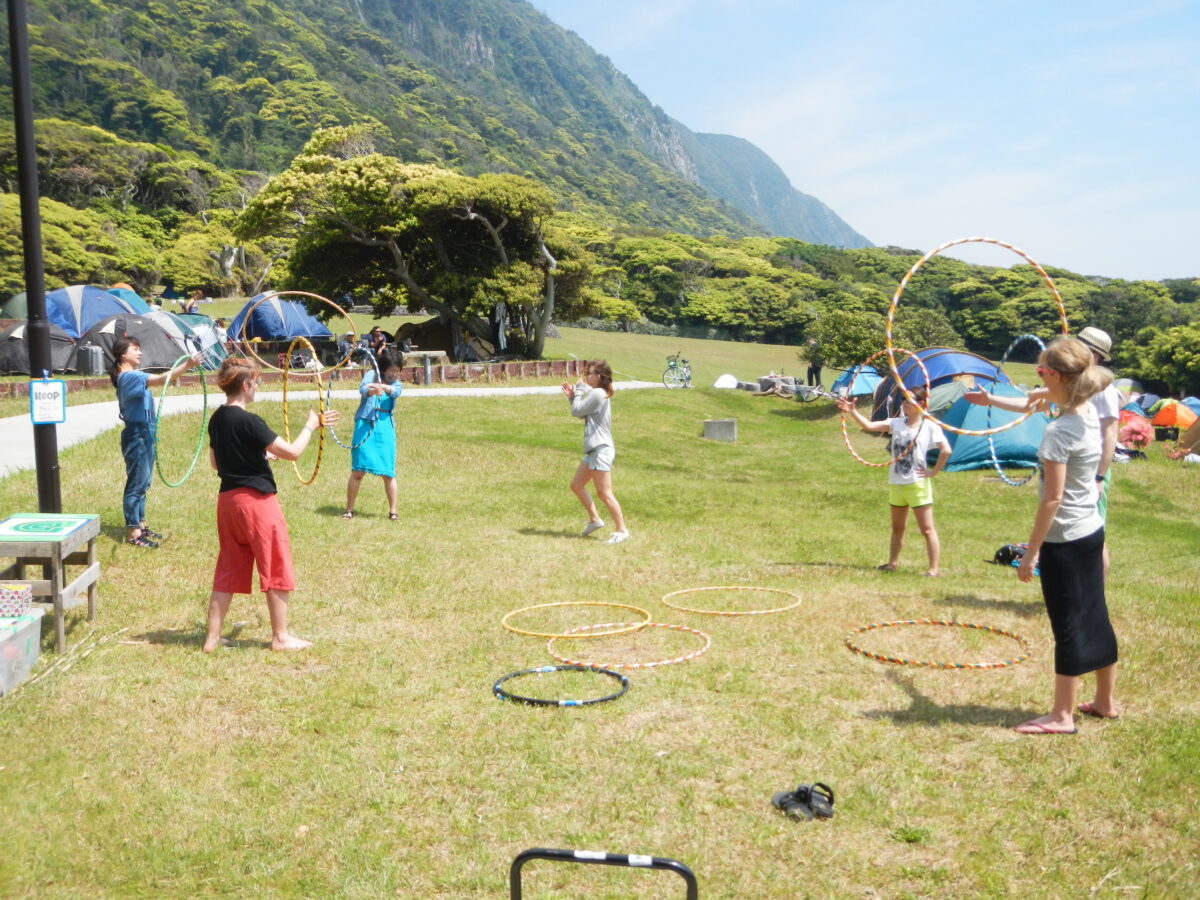
Off-body hooping

Off body hooping needs space to extend the arm with the hoop and spin all the way around without smacking anyone. Some tricks, like the eagle roll or many off-body twins moves, require space for a hoop on both sides.

 Calculate armspan + two hoops.  Using the same example sizes as above, you’ll need a 12″/370 cm circular space, or 144 square feet/14 sq m per hooper.

That’s quite a bit of area, so if you aren’t going to be doing a lot of twins play or eagle rolls, you can figure it by armspan + 1 hoop which is about 81 sq ft/7.5 sq m per person. 

Overhead hooping

Ceilings! Hooping needs more height than most dance activities, so you’ll find lots of dance and yoga studios with low ceilings or lights hanging down into space we need for mandalas and overhead passes. The perfect ceiling is really, really high for throws. Unless you’ve secured a gymnasium, you need to think about the space above your head. With lower ceilings, you’ll need to limit the overhead tricks .

A good overhead height will be height + arm + hoop  and for sake of simplicity, let’s call the arm half the height of the body (it’s usually a bit less than half). For your 5’7″ hooper with a 40″ hoop, you’ll want about 11 feet/3.5 m of clearance.

Other space in your space

When figuring out the number of students that will fit into your prospective studio, don’t forget space for yourself and for the inevitable gap between instructor and students. You may also need space for people’s coats and bags, extra hoops, and other gear.

Categories
Materials & Essays

15 Tips for Teaching Outdoors

It’s summertime and the parks and beaches are calling. Let’s go outside to teach! Here are a few practical pointers:

The Space

  1. Circles are great structures for the class space and keep onlookers from randomly joining the group. If you are all lined up in rows or scattered randomly in a space people tend to wander over and join. That’s not an issue if you’re doing a free class, but if your students paid to be there then you want to keep it exclusive.
  2. If you are getting down on the ground, whether it’s in the warmup or specific move training, be sure you have enough yoga mats or picnic blankets. Ask people bring their own and have a few spare. Most urban folks aren’t too keen on rolling around directly on grass and dirt.
  3. Check your park for a shady spot or time your session in the cooler part of the day. Activity in full sun is unpleasant.
  4. Be aware of the condition of the ground. Try to avoid uneven ground, loose dirt or soft sand. Groom the area before class by picking up trash, removing large stones, etc.
  5. Not all outdoor spaces are suited to music; try leading your outdoor classes without tunes. If you do choose music, make sure it is loud enough for your students to hear but not blasting nearby picnickers.
  6. Create a secure space for bags. A tarp in the center of the circle works and helps to keep the circle from drifting, too. Encourage students to leave valuables at home.

The Onlookers

  1. What you’re doing is fun to watch, so expect photographers and gawkers. Bystanders may interrupt your class with questions. Practice gestures that clearly indicate wait a moment, no, and yes. Be careful not to let interruptions disturb the flow or focus of your students.
  2. Deliver all communication to strangers with a smile, even the no. Nobody wants their instructor to seem angry. I’ve failed on this a few times and it’s done bad things for my reputation.
  3. Wear a t-shirt with your brand/name/logo, city, and contact info on it. The location and contact info help people to see that you are local and they can get in touch with you. Also, have your flyers or business cards out and ready share.
  4. If you normally end your class with a group routine or review of the tricks you’ve taught, you may have a built-in audience in the park. Make use of it and put on a show for them.

The Class

  1. Start with a warmup to get everyone focussed. An outdoor classroom has a lot of distractions and sometimes students can be shy when they know people might be watching.
  2. Outdoor classes allow you to teach big moves, high tosses and other things that need lost of vertical space. Take advantage of that.
  3. Offer more breaks than you would normally, especially on very hot or sunny days. Five minute water breaks also give you a chance to speak with people trying to interrupt your class.
  4. Get a group shot after class. You’re in a beautiful setting. Capture the moment.

The Rules

  1. Check with your city parks/rec department to find out about permits. Some places require them for large groups or events that charge a fee. It is embarrassing and upsetting if your class is broken up by park police, believe me.
  2. Decide on a rain policy. If the weather is inclement, will you refund, reschedule, or relocate the class?
Categories
Materials & Essays

DIY Juggling Balls

juggling-balls

It’s easy and inexpensive to make your own juggling balls for practice or, in my case, a whole bunch for workshops.

For each set of three balls, you’ll need:

300 grams of rice, about 1/2 cup for each ball
9 (or more) 9″ latex balloons
3 lightweight plastic bags or plastic wrap
scissors
tape (optional)

Cut the necks off the balloons. Pour 1/2 cup (100 grams) of rice into each bag. Twist the bag shut, removing any extra air, and trim the twisted end into a tail a few centimeters long. Optionally, tape the twisted part to the bag to prevent spillage. Open the cut end of the balloon and stretch it around the bag. Repeat with the remaining balloons, alternating sides to cover the circular gaps.

Done! The balloons tend to rip and shred when dropped on rough surfaces, so carry a few spare balloons with you for repairs.

Categories
Materials & Essays

50 Positive Words for Hoop Teachers

Using positive words with students is a powerful teaching technique. Everyone responds well to genuine and sincere praise. It’s especially helpful to point out something specific about a student’s effort – whether it is how hard they are working, a natural gift for rhythm, or graceful footwork.

But as a teacher, I find myself stuck using the same three or four phrases repeatedly. I am sure my students are getting bored being told they are awesome, terrific, and gorgeous! So here is a list of 50 useful adjectives that you can use to pump up your praise without repeating yourself. These are also helpful for your own personal affirmations and self-praise.

  1. Alive
  2. Amazing
  3. Animated
  4. Awesome
  5. Beautiful
  6. Blissful
  7. Brilliant
  8. Bubbling
  9. Calm
  10. Comfortable
  11. Courageous
  12. Curious
  13. Ebullient
  14. Effervescent
  15. Energetic
  16. Enlivened
  17. Enthusiastic
  18. Excited
  19. Expressive
  20. Exhilarated
  21. Exuberant
  22. Fabulous
  23. Free
  24. Gorgeous
  25. Graceful
  26. High spirited
  27. Hopeful
  28. Hot
  29. Inspired
  30. Intense
  31. Invigorated
  32. Joyous
  33. Lively
  34. Motivated
  35. Optimistic
  36. Passionate
  37. Patient
  38. Powerful
  39. Radiant
  40. Refreshed
  41. Serene
  42. Soft
  43. Stimulated
  44. Strong
  45. Superb
  46. Surprised
  47. Terrific
  48. Vigorous
  49. Wonderful
  50. Zestful

 Not sure how to start? Try some of the words in these phrases:

You look ____!
When you do X, you show how _____ you are.
Your X is so _____.
I really like how _____ you have become at X.
Do you know how _______ you are?

Categories
Materials & Essays

How to Engage an Audience

There are a lot of tips given to new hoop performers and one of them is always “engage the audience.” Unfortunately that advice is rarely followed up with instructions beyond “smile and make eye contact.” So for my own good, and maybe yours, too, I’ve written up 3 Ways to Engage Your Audience.

Categories
Guru-guru Camp Materials & Essays

Hoop DANCE Game at Guru-guru Camp 2013

During the “High-Low Hoop Dance” workshops I taught at GGC, we played a game using action verbs to create more varied body movement in our hoop dance. This video shows the dynamic sequences that our hoopers created using the prompts.

All the details of the Hoop DANCE Game, including ways to play the game and a list of the 64 dance verbs, are in the FREE STUFF section for you to enjoy.

Categories
Materials & Essays

Hoop Games

Preparing a kids party? Looking for ideas to spice up your classes? Want to inject some fun into a hoop jam? Here is my list of 22 tried and true hoop games. It’s organised by type of game and includes variations, suggested ages and more.  Have fun with it!

Hoop Games  (Google Doc)

Categories
Guru-guru Camp Hoop Tutorials Materials & Essays

Evening Hoop Meditation

During Guru-guru Camp, I held some evening hoop meditation sessions. They involved a number of different moving meditations, but this one was a favorite with everyone. It’s a guided meditation based on one I learned via Caroleeena. You’ll be waist hooping in two directions as you listen to the instructions to release negative thoughts and gather positive energy. Because it happened during our camp retreat, you may notice some references to outdoor and camp-related concepts.

[soundcloud url=”http://api.soundcloud.com/tracks/45650663″ params=”auto_play=false&show_artwork=true&color=ff7700″ width=”100%” height=”166″ iframe=”true” /]

Script and narration: Kristen McQuillin
Music: Learn to Fly by Josh Woodward

Categories
Materials & Essays

A Tutorial on Hoop Tutorials

Hula hoop trick and movement tutorials are the key to our online community sharing its knowledge. Some tutorials are incredibly good, others are unfortunately difficult to watch due to technical failures, poor editing, or bad planning.

I’ve been a hooper since 2008, but a video producer/editor since 1995 and an educator for even longer than that. I have made scores of educational videos and tutorials.  I have some opinions about what makes a tutorial video great:

Filmed in good light with clear sound and an awareness of surroundings and distractions, the teacher knows her topic. The tutorial begins with a view of the goal. The material is explained using at least two learning modalities (visual, auditory, reading, etc). Teacher and editor know where to place emphasis in the tutorial – more time on the tricky parts, less time on the credits. The footage is filmed with the final video in mind and edited with an eye for brevity and clarity.  Overall the tutorial teaches the topic well and offers inspiration beyond the material.

Video projects have three stages: pre-production, production, and post-production. These are fancy filmish ways of saying planning, filming, and editing. Let me walk you through some of the points in each stage that you can consider for your next tutorial.

Pre-Production (Planning)

  1. What move are you teaching? Can you do it smoothly for the camera? If not, keep practicing or choose another move for your tutorial.
  2. How will you explain the material? What are you going to say?
    • It’s a good idea to “say what you’re going to say, say it, then say what you said” to reinforce the learning. In a hoop tutorial, that means a demonstration of the move, the instruction, and another demo at the end.
    • You might go as far as writing a script, or maybe you prefer to simply think through the main points. Personally, I like cue cards or notes.
    • It’s smart to practice your patter, especially if it’s your first time teaching or working on camera.
    • You can keep it short by paring the explanation to the basics, or make it longer by micro-explaining.
    • Consider your audience – beginners may need details about everything but if you are teaching an advanced move, it’s ok to assume some knowledge.
  3. Scout your location.
    • Do you have enough room? If you aren’t able to do the move in its full expresion, everyone will learn to do it wrong. Caroleeena once did a tutorial where the hoop was accidentally tapping the ground – now everyone taps the ground when they do the move, even though that wasn’t meant to be part of the move. Remember that your camera needs space, too, or you’re going to cut off your head or feet in the shot.
    • Make sure there is light. Indoors:  You want the light source in front of you, not behind you, so don’t stand in front of a window even if the view is spectacular. Frame the shot so no light fixtures are in it; these will mess up the automatic systems in your camera. Outdoors: you want the sun in your face or less than 45 degrees to your side. A slightly overcast day is good. Dappled light from leaves makes it harder to see the action.
    • Avoid distractions. Try not to have too many people moving or making noise in the background. If you’re filming indoors, it’s smart to remove clutter from the space behind you. Maybe the puppy needs to be in another room.
    • Consider the color of your hoop, surroundings, and clothing. You want some contrast so people can see clearly.
  4. Check your gear. Can your microphone pick up the sound of your voice? Is your location noisy or windy? If you can’t get clear, loud audio, consider doing a voice over with the explanations. Does your camera capture the motion smoothly? You may need to adjust frame rates or other settings.
  5. Find a tripod or stable platform for the camera. Keep the camera still when your hoop is moving. The more motion you add to your video unintentionally (via handheld jitter, wind rustling through leaves, cars speeding past, etc.) the crappier your video will look when it’s compressed on YouTube.
  6. Recruit a crew. You can film solo, but having one or two people to help will allow you to focus on teaching and not worrying about whether you were in frame. Someone to man the camera, another to hold cue cards, maybe?

Production (filming)

  1. Plan on doing two takes, at least. This will give you options when you are editing. On the other hand, too much footage takes forever to review. Strike a balance between “let’s do that again” and “let’s move on.”
  2. You don’t have to film in sequence. Go ahead and do the intro last, or get all the closeup shots at once. That is why we edit.
  3. You don’t have to film continuously. Short shots can be pieced together to tell the whole story. Change angle or view (close up, full body, etc) of each take to make the edit look professional.
  4. Keep up your energy. Do your best to maintain a similar tone through the whole video and every take. Give yourself breaks as needed. Have snacks and drinks ready if your shoot is going to run long.
  5. Shots to get (not necessarily all of them):
    • Demonstrate the move. Let the audience see what you’re going to teach them. Film the move in flow and also as a stand-alone move.
    • Introduce yourself and name the move. “Hi, I’m Kristen from Spin Matsuri and today I’m going to show you how to do the Twisty Fumble Super Hop”
    • If there are prerequisites to this move, list them. “You’ll need a hoop small enough to fit between your legs, and you also need to be able to do a jump-out from your neck, so if you haven’t got that down yet please check out my “neck jump-out”  tutorial first.”
    • Break it down step by step.  This is especially key in a sequence of moves. Don’t fail to mention grip, transitions, the hand you’re using, and hoop direction.
    • Talk it through, but if your camera microphone is weak or you are in a noisy area, consider keeping your mouth closed, showing each step silently, and doing a voice over afterwards.
    • Slow the move down either by doing it slowly as you are filming or in slo-mo when you are editing.
    • Show it from different angles. Turn your body or move the camera.
    • Get in close. If you need to demonstrate a grip or another sort of detail, use a close up.
    • Film some “b-roll” – extra bits to tuck between shots. Could be your feet while doing the move, your smile, an extreme closeup of the hoops moving. B-roll comes in handy when editing.
  6. Troubleshoot and give some tips. Explain what to do if it isn’t working. “If the hoop gets caught on your ear, try turning your face more forward before hopping through. I like doing this move as a transition between the Triple Hyperwave and the Shimmy Slot.”
  7. Demonstrate any variations or transitions in and out of the move to give ideas to your precocious students.

Post-Production (editing)

  1. Titles. Keep them short and sweet. Viewers are going to watch your video repeatedly to learn the move; don’t make them sit through a long animated introduction every time.
  2. Credits. All on one screen, if possible, for the same reason as short titles.
  3. Basic editing sequence for a tutorial: title, demonstration of move, tutorial in detail (break down, slow-mo, close-ups, alternate angles), tips and troubleshooting, demo in flow or variations, credits.
  4. Add annotations, subtitles, arrows, and diagrams as necessary. They can be effective in drawing attention to the details and they incorporate another learning modality.
  5. Cut, don’t fade.  Put the clips together in order and see how it looks.  99% of the time, you don’t need fancy transitions in tutorials. Save them for your story videos.
  6. If cutting together two similar shots, viewers will not notice a jump or disconnection if you use shots that were taken from different angles or put b-roll between shots taken form the same angle.
  7. Use music sparingly. Unless you are teaching a choreography, you can skip the BGM. This also avoids potential copyright and licensing issues.
  8. Trim away the excess. Seeing the teacher getting into position in front of the camera is not required for the tutorial. Chop it out.
  9. Edit at maximum size and let your video host do the final compression. Give YouTube (or Vimeo or whoever) the best quality you have.

That said, I don’t always follow my own advice. I’ll film in on a whim in my pajamas on the cramped balcony with the camera precariously balanced and my husband rattling around in the kitchen and then I’ll throw the result onto YouTube without editing. This does not create a really great tutorial, no matter how awesome my intention may be.  Do what I say, not what I do. 😉

Categories
Materials & Essays

Organizing Free Events

Spin Matsuri has been hosting hoop jams and other (mainly free) hooping get togethers since 2009. Here are some things I’ve learned and suggestions for making your free event successful.

  1. Research your venue. Usually I hold our jams in parks or at the beach. Outdoor venues are usually free, which fits the budget.  But not all parks allow music, others are fussy about where you can play (only on the grass, only in the playground, etc), some don’t like signs. Make sure you scope out the place where you want to hoop. Know where to find the nearest toilets, vending machine, water fountain or convenience store because people will ask you about them.
  2. Consider a theme. If you are holding a regularly scheduled event, an occasional theme added to the mix can be a lot of fun and provide a boost to attendance. We’ve enjoyed Hawaiian hooping, mini-lessons, a video shoot, and World Hoop Day dance practices. If you are holding your event on a holiday, consider using that as a base for your theme.
  3. Get the word out. Let people know when and where you’ll be. Word of mouth is great but folks forget. Whether you use your favorite social network, e-mail or flyers, give everyone a way to get the details, including a map.
  4. Arrive early. If you’ve advertised a 2 pm hoop jam, aim to get there at 1:30. Give yourself time to get the space ready. Set up your music, unbundle your hoops, layout your picnic gear. Start hooping so people can find you.
  5. Bring supplies. Music and hoops, for sure. Maybe snacks and drinks to share and a picnic blanket. And don’t forget your personal provisions – sunscreen, a hat, whatever else you need to make your day pleasant.
  6. Hoist the flag. Hoops will make the group stand out, but you may want to have another form of identification – a sign, a flag, a hoop display.
  7. To disclaim or not? In the US, lots of organizers are concerned with liability and have participants sign waivers or disclaimers. In Japan this hasn’t been much of a concern for us. What you decide to do on this front is up to you.
  8. Signups and name tags. Although I generally don’t bother asking people to sign in and wear name tags, one of the local poi gatherings does and they have a simple and elegant system. The organiser has a clipboard, a roll of duct tape and a Sharpie marker. When people arrive, he gets them to sign in and write their own name tag to stick on the body part of their choice. 
  9. Promote your other events. Make sure you have a take-away with information about other events you’re holding. It doesn’t matter whether it is a business card with your URL or a flyer with the upcoming dates as long as there is something to hand out to interested people. 
  10. Encourage onlookers. Spread the hoop love by encouraging onlookers. Those people standing on the fringes of the group or who stopped to watch a while – they secretly want to play with you. Give them a chance to try the hoop. I usually grab a bunch of hoops, catch an eye and run over to hand hoops to people. They may demure, but once they touch the hoop, they usually spin it, too. And some people return for future hoop jams.
  11. Have hoops for sale. Set aside one or two hoops for sale. Mark them with tags and signs so they don’t get used in the regular jam. You won’t sell a hoop every time, but there will be a few people over the course of a year who are interested enough to buy a hoop on the spot.